2013 February 11: Remove broken petcock from tank (0.75 hours ) Updated: 2013 February 11
First entry | Previous entry | Next entry | Last entry
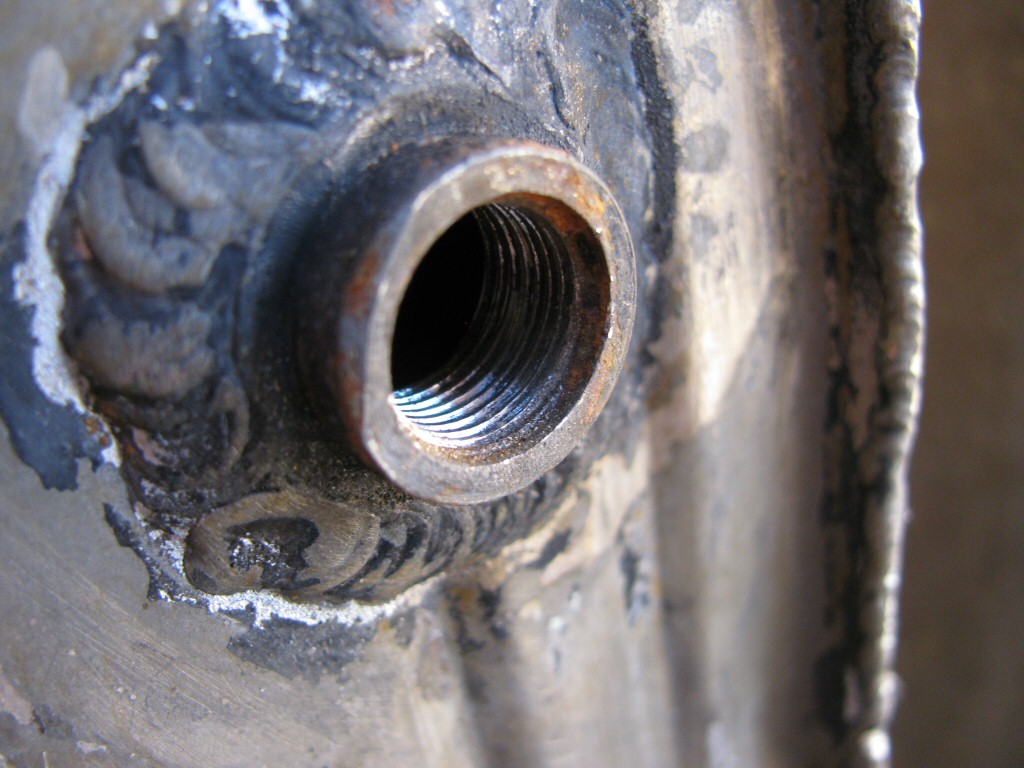
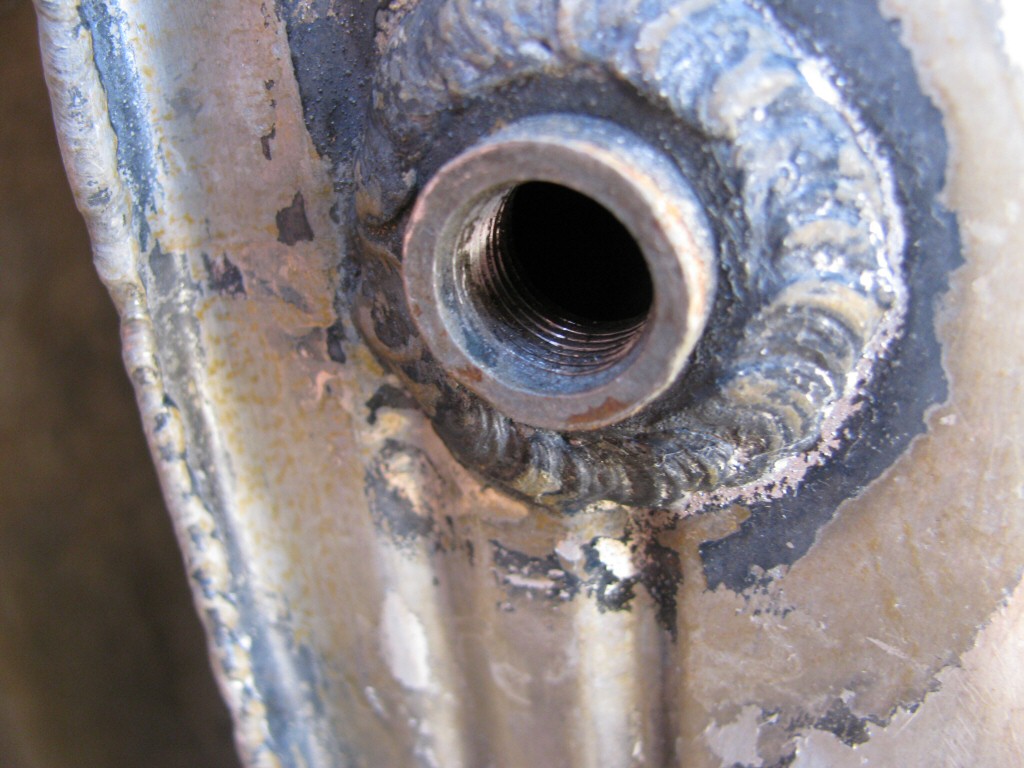
When I started this project, I noted that there were no petcocks in the gas tank. In fact, the remains of one broken-off petcock remained. Tonight after work I used progressively larger drill bits until I had gotten most of the petcock removed. A few light taps with a small punch and I had knocked the remainder inside the tank. I chased the threads with my 12 mm × 1 mm tap and test fit a pair of petcocks. All is well and I am thrilled that I will not need to repair the threaded bungs (or make due with NPT threaded plugs - which I dislike).
With that accomplished, I needed to remove all of the material that had fallen inside the tank when I drilled out the old petcock. The pecocks have brass bodies and brass is not attracted by magnets. Shaking it out of the filler tube neck is a ridiculous proposition. So, I shook all the material into one side of the tank and then vacuumed it out with my shop vac. Of course, my shop vac does not have an attachment small enough nor long enough to reach down from the filler neck into the bottom of the tank. So, I grabbed a length of PVC pipe that would fit from the filler neck down to the bottom of one side of the tank. I secured the PVC pipe to an attachment on my shop vac with electrical tape such that it would not leak. This worked like a charm and easily sucked out all of the little pieces and larger chunks.
Left side petcock threads: strong and healthy.Photo courtesy of Gregory Bender.
Right side petcock threads: strong and healthy.Photo courtesy of Gregory Bender.
First entry | Previous entry | Next entry | Last entry
Additional entries for this project
2012 October 10: History and plans 2012 October 11: Let the fun begin... (1.25 hours ) 2012 October 12: A possible vision... (0.00 hours ) 2012 October 12: More disassembly (1.25 hours ) 2012 October 13: Organizing (0.50 hours ) 2012 October 14: Degreasing (2.50 hours ) 2012 October 15: More degreasing (1.75 hours ) 2012 October 16: Remove tires (0.35 hours ) 2012 October 17: A revised vision... (0.00 hours ) 2012 October 17: More cleaning and dregeasing (1.75 hours ) 2012 October 18: Prepare wheels for un-lacing and begin engine disassembly (1.35 hours ) 2012 October 20: Engine and transmission disassembly and cleaning (6.40 hours ) 2012 October 21: Flywheel and clutch cleaning (1.15 hours ) 2012 October 22: Clean engine internals (3.15 hours ) 2012 October 24: Getting organized (1.50 hours ) 2012 October 25: Rear drive disassembly (3.50 hours ) 2012 October 25: Tappets (0.00 hours ) 2012 October 27: Transmission bearing removal (0.50 hours ) 2012 October 28: Remove spokes from wheels (3.25 hours ) 2012 November 02: Powder coat prep (0.35 hours ) 2012 November 03: Frame prep (1.25 hours ) 2012 November 07: More frame prep (1.50 hours ) 2012 November 08: Drop off parts to be repaired (2.00 hours ) 2012 November 10: Clean replacement cylinder head (0.15 hours ) 2012 November 14: Drop by Bronson's house (2.00 hours ) 2012 November 15: Cylinder stud (0.10 hours ) 2012 November 15: Make new tabs (1.00 hours ) 2012 November 19: Cylinder stud revisited (0.10 hours ) 2012 November 19: Pick up repaired frame (1.50 hours ) 2012 November 20: Frame finishing, cleaning (3.00 hours ) 2012 November 21: Drop off parts at Arizona Powder Coat (2.00 hours ) 2012 November 29: Order new bearings (0.00 hours ) 2012 December 03: Drop off parts at my machinist (2.00 hours ) 2012 December 07: Pick up parts from Arizona Powder Coat (2.00 hours ) 2012 December 08: Unwrap powder coated parts (0.50 hours ) 2012 December 10: Clean transmission parts (2.00 hours ) 2012 December 10: First attempt to get a polish and chrome estimate (1.00 hours ) 2012 December 10: Getting ready for a trip to the polish and chrome shop (3.60 hours ) 2012 December 10: Ship small triangle cover to Timbucktoo Machine (0.50 hours ) 2012 December 11: Drop off polish and chrome parts (1.00 hours ) 2012 December 12: Acid wash engine and transmission cases (4.15 hours ) 2012 December 13: Polish spokes and nipples (2.30 hours ) 2012 December 13: Ship gas tank (1.00 hours ) 2012 December 14: Clean threads on all nipples (0.50 hours ) 2012 December 18: Starter disassembly, etc. (2.00 hours ) 2012 December 31: Triangle arrived back from Timbucktoo Machine (0.00 hours ) 2013 January 03: Pick up polish and chrome parts (1.00 hours ) 2013 January 03: Valve guides ordered (0.00 hours ) 2013 January 05: Valve guides arrived (0.00 hours ) 2013 January 07: Dropped off valve guides (2.00 hours ) 2013 January 11: Gas tank delivered (0.00 hours ) 2013 January 29: Visit the chrome plater (1.00 hours ) 2013 January 31: Bronson picks up my gas tank (0.00 hours ) 2013 February 01: Minivan repaired (0.00 hours ) 2013 February 01: Order side covers (0.00 hours ) 2013 February 02: Chat with Bronson about the gas tank (0.25 hours ) 2013 February 03: MGNOC breakfast (0.00 hours ) 2013 February 04: Contact Eric Lussier of Second Avenue Scooters (0.25 hours ) 2013 February 04: Side covers arrive (0.00 hours ) 2013 February 05: Pick up gas tank from Bronson's house (1.00 hours ) 2013 February 10: Purchased single gauge dash and speedometer (0.00 hours ) 2013 February 11: Remove broken petcock from tank (0.75 hours ) 2013 February 12: Check gas tank for leaks (0.50 hours ) 2013 February 14: Single gauge dash and speedometer arrived (0.00 hours ) 2013 February 15: Drop off tank at chrome shop (1.50 hours ) 2013 February 15: Speedometer sent out for repair (0.00 hours ) 2013 February 16: Cylinder head and connecting rods ready (0.00 hours ) 2013 February 19: Speedometer shop called (0.00 hours ) 2013 February 21: Call the chrome shop (0.00 hours ) 2013 February 21: Picked up cylinder heads and connecting rods (1.50 hours ) 2013 March 30: Rebuilt the starter (2.50 hours ) 2013 April 05: Forks (1.35 hours ) 2013 April 07: Wheel assembly (1.70 hours ) 2013 April 09: JB Weld (0.50 hours ) 2013 April 11: Powder coat clean up (1.35 hours ) 2013 April 13: Start on fork assembly, rebuild distributor (3.50 hours ) 2013 April 15: Purchase tap for fork tubes (0.00 hours ) 2013 May 02: Take tank to get leak repaired (1.50 hours ) 2013 May 08: Create a sacrificial gas cap (0.50 hours ) 2013 May 09: Take panel pattern and sacrificial gas cap to chrome plater (1.50 hours ) 2013 May 11: Assemble forks (4.00 hours ) 2013 May 18: Finish fork assembly and start on the generator (1.60 hours ) 2013 May 25: Finish wrapping the field coils, prep for TimeSert (0.75 hours ) 2013 May 27: Begin transmission assembly (3.65 hours ) 2013 June 08: More transmission work, begin engine assembly (3.50 hours ) 2013 December 11: Drop off more parts for polish and chrome (3.00 hours ) 2014 January 10: Pick up parts that have been polished and chromed (1.50 hours ) 2014 March 24: Resume work on transmission assembly (2.00 hours ) 2014 March 25: Found missing transmission part (10 minutes ) 2014 March 26: Clean up metal sealing ring for layshaft seal (30 minutes ) 2014 April 08: Attempt to torque layshaft nut (10 minutes ) 2014 April 12: Transmission complete (60 minutes ) 2014 September 22: Drop off more parts for polish (1.50 hours ) 2014 September 24: Pick up parts that have been polished (1.50 hours ) 2014 October 01: Drop off tank at another chrome shop (2.00 hours ) 2014 October 04: True front wheel (1.60 hours ) 2015 February 20: Rebuild handlebar switch (2.25 hours ) 2015 June 07: True front wheel (2.50 hours ) 2015 August 08: Replace spline assembly in rear hub (1.00 hours ) 2015 November 01: Assemble rear wheel (1.35 hours ) 2015 November 13: Clean rear drive, true rear wheel (4.50 hours ) 2015 November 23: Pick up tank from chrome shop (2.00 hours ) 2015 November 29: Assemble and prepare parts for zinc plating (4.00 hours ) 2015 December 01: Drop off parts to be zinc plated (2.50 hours ) 2015 December 06: Rear drive thread repair (0.85 hours ) 2015 December 11: Pick up parts from zinc plater (2.50 hours ) 2015 December 12: Work on generator (2.00 hours ) 2015 December 13: Work on generator (3.00 hours ) 2015 December 17: Flatten engine case and sump (2.15 hours ) 2015 December 17: Work on generator (3.70 hours ) 2015 December 18: Front main bearing (1.50 hours ) 2015 December 18: Work on generator (0.85 hours ) 2015 December 19: Engine assembly (2.00 hours ) 2015 December 20: Engine assembly (1.50 hours ) 2016 January 31: Triple tree, oil pressure relief valve, etc (4.50 hours ) 2016 February 07: Connecting rod shells, oil pump, swing arm (3.00 hours ) 2016 February 20: Install universal joint, misc (1.25 hours ) 2016 February 21: Clean carburetor parts (2.00 hours ) 2016 February 28: Clean throttle and polish small bits (1.00 hours ) 2016 March 06: Throttle and rear brake (1.50 hours ) 2016 March 27: Front brake (1.00 hours ) 2016 March 28: Engine assembly (4.25 hours ) 2016 April 24: Engine assembly (3.00 hours ) 2016 April 30: Generator studs, transmission alignment, clutch hub (1.50 hours ) 2017 November 15: Engine assembly (3.30 hours ) 2017 November 22: Initial assembly (4.50 hours ) 2017 December 01: Assembly and testing for proper fitment of components (8.25 hours ) 2017 December 10: Assembly (3.50 hours ) 2017 December 15: Assembly (5.00 hours ) 2017 December 16: Assembly (5.00 hours ) 2017 December 18: Side covers and breather (1.50 hours ) 2017 December 20: Transmission shift linkage (0.25 hours ) 2017 December 22: Side covers (1.50 hours ) 2017 December 23: Cables and side covers (2.00 hours ) 2018 June 23: Test fit all painted parts (4.50 hours ) 2018 June 30: Remove left cylinder head (0.50 hours ) 2018 July 01: Drop off painted parts and cylinder head to be repaired (2.00 hours ) 2018 July 20: Pick up repaired cylinder head (1.00 hours ) 2018 November 19: Pick up painted parts (2.00 hours ) 2018 November 23: Install painted parts (4.00 hours ) 2018 November 24: Install painted parts (3.50 hours ) 2018 November 30: Install generator and breather (0.50 hours ) 2018 December 07: Install generator and breather (0.75 hours ) 2018 December 17: Brakes, spokes, old header pipes, etc. (3.00 hours ) 2018 December 18: Tires and lower from jack (4.00 hours ) 2018 December 19: Create wiring harness and misc (5.00 hours ) 2018 December 20: Install wiring harness (3.00 hours ) 2019 February 10: Rebuilt ignition switch (3.00 hours ) 2019 February 23: Install wiring harness (2.00 hours ) 2019 March 10: Airbox (1.00 hours ) 2019 September 02: Wiring (3.00 hours ) 2019 September 04: Mufflers, rear brake switch, generator cover (2.50 hours ) 2019 September 06: Install speedometer and dash (2.50 hours ) 2019 September 15: Spark plug wires (1.50 hours ) 2019 November 30: First start up (4.50 hours ) 2019 December 22: Reflector, shift lever, generator (4.00 hours ) 2019 December 23: Neutral switch, parking lights, generator (3.50 hours ) 
