Voltage regulator replacement
Moto Guzzi Quota 1000 and Quota 1100 ES models
Updated:
ElectroSport
ElectroSport Industries (formerly Electrex) has replacement regulators for the Quota alternators (and other Moto Guzzi models as well). The part number is ESR510 (old part number RR51). This voltage regulator is a direct replacement and will maintain all original functionality. However, the wire terminals do need to be modified.
Euro Motoelectrics
Euro MotoElectrics EnDuraLast part numbers EDL-450VoltRect or EDLGUZ-VoltRect. These voltage regulators are direct replacements and will maintain all original functionality. However, the wire terminals do need to be modified on the EDLGUZ-VoltRect. EDL-450VoltRect is plug and play and will require no modification to the original wiring.
Harley Davidson voltage regulator
Thanks to Russ Marooney for providing the following photos and starting information regarding how he replaced the stock voltage regulator with an inexpensive 32 amp unit designed for Harley Davidson motorcycles.
I've been noticing that my voltage output has been declining for a while now. Rather than wait to be stranded, I decided to go ahead and replace my voltage regulator (and stash the slowly failing unit on the bike as a backup). I decided to try the less expensive Harley Davidson unit rather than the more expensive Guzzi specific unit. While the Harley Davidson unit regulates voltage just fine, it does not maintain all original functionality. Specifically, you will lose the dash indicator light when you install the Harley Davidson voltage regulator. For me, this isn't a problem because I have a volt meter installed. But, if you want to keep your dash indicator bulb, do not install this voltage regulator.
The Harley Davidson unit was originally designed to fit 1989 to 1999, 80 inch Evolution Big Twin motorcycles. Here are a variety of part numbers for this voltage regulator:
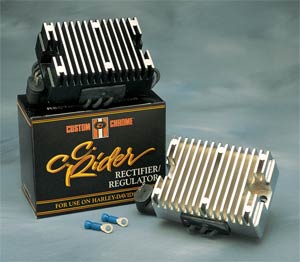
- Custom Chrome part number 25-353 (25353). This is the one Russ Marooney installed.

Custom Chrome part number 25-353 (25353). Can be mounted on a Moto Guzzi Quota 1100 ES. Photo courtesy of Custom Chrome.
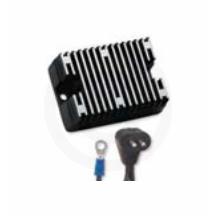
- Drag Specialties part number DS-313020 (DS313020). This is the one I installed.

Drag Specialties part number DS-313020 (DS313020). Can be mounted on a Moto Guzzi Quota 1100 ES. Photo courtesy of Drag Specialties.
- Harley Davidson part number 74519-88 (7451988).
Installation
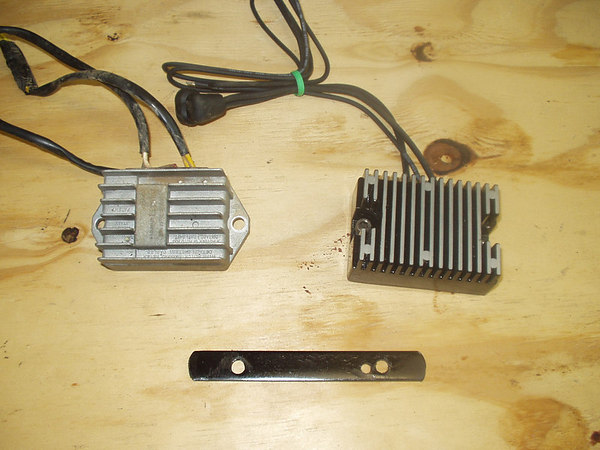
- The mounting holes on the Harley Davidson voltage regulator are not spaced the same distance apart as on the original Moto Guzzi voltage regulator. So, start by crafting a mounting bracket.

Simple mounting bracket for mounting an aftermarket voltage regulator on a Moto Guzzi Quota 1100 ES. Photo courtesy of Russ Marooney.
- Wire connections
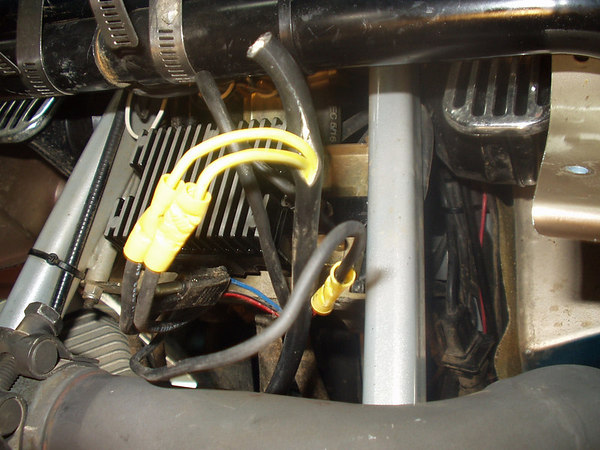
- There are two yellow wires exiting the alternator that connect to two yellow wires on the original Moto Guzzi voltage regulator. These two wires must be connected to the two wires on the Harley Davidson voltage regulator that have the two-prong plug on them. It does not matter which goes to which, just connect them.
- There is a single red wire on the Original Moto Guzzi voltage regulator. This wire goes to the battery and charges it. This red wire must now be connected to the single black wire exiting the Harley Davidson voltage regulator.
- The remaining two wires (black and white) that are connected to the Moto Guzzi voltage regulator are for the dash indicator bulb. Since there is no corresponding connections on the Harley Davidson voltage regulator, there is nothing to connect them to.
- NOTE: While Russ' photos show modification to the original wiring harness, I chose not to go that route. Instead, I chose to modify the wiring on the voltage regulator so as to mate properly with the original wiring harness; leaving the Moto Guzzi wiring harness intact and unaltered.

Wiring detail for mounting an aftermarket voltage regulator on a Moto Guzzi Quota 1100 ES. Photo courtesy of Russ Marooney.
- Grounding the voltage regulator is critical (both on the Harley Davidson voltage regulator and on the original Moto Guzzi voltage regulator). The grounding is through the body of the voltage regulator, through the mounting bracket, and into the frame (to which the battery ground is also connected). I also have a 10-gauge wire going directly from the voltage regulator mounting bolt to the engine case.