Engine out? Check these things
Moto Guzzi V700, V7 Special, Ambassador, 850 GT, 850 GT California, Eldorado, and 850 California Police models
Updated:
If you've gone to all the trouble to remove the engine from your bike, you might as well check and replace as necessary the following items (it sure beats taking the engine out again).
Top of the engine
- Install studs (instead of bolts) to secure the generator mounting bracket. Secure in place with thread locking compound.
More information on what to do is described in the
Electrical components
section: Generator bracket
Timing chest
- Front main seal.
- Timing cover gasket.
- O-ring behind the crankshaft timing gear.
Inside the bell housing
- All clutch components.
- Rear main seal.
- Rear main flange gasket.
- The two 12 mm aluminum crush washers that connect the small steel oil return line from the breather to the bottom of the bell housing.
- The gasket for the plate to which the large steel inlet line from the breather connects at the top right of the bell housing.
- Replace the 6 bolts that attach the flywheel to the harder 10.9 grade black oxide bolts; size: 8 mm × 1.25 mm × 25 mm.
- Replace the 3 metal strips under the 6 flywheel bolts with 6 Schnorr safety washers; size: 8 mm. When you examine the new washers, you will notice that they are not flat, but have a slight cone shape to them. After examining the documentation on the Schnorr web site, I've determined that the convex portion (arched outward) of the washer should face the head of the bolt. Correspondingly, the concave portion (indented) of the washer should face the flywheel.
- Be sure to use a medium strength thread locking compound on the flywheel bolts and torque to 30 foot pounds.
- Be sure to use a sealant on the two bottom rear main flange securing bolts. These bolts go all the way through to the inside of the engine case and will leak oil if not sealed. I use a sealant such as ThreeBond 1184 semidrying liquid gasket.
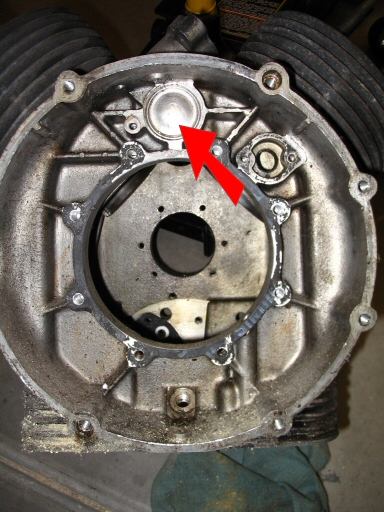
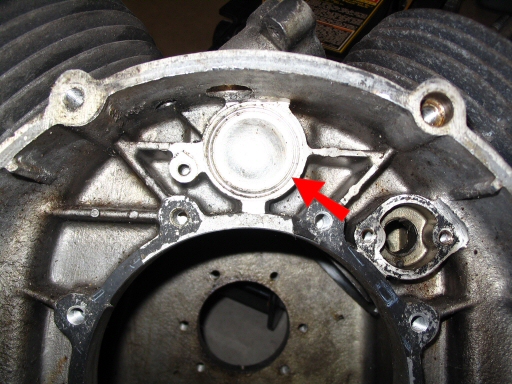
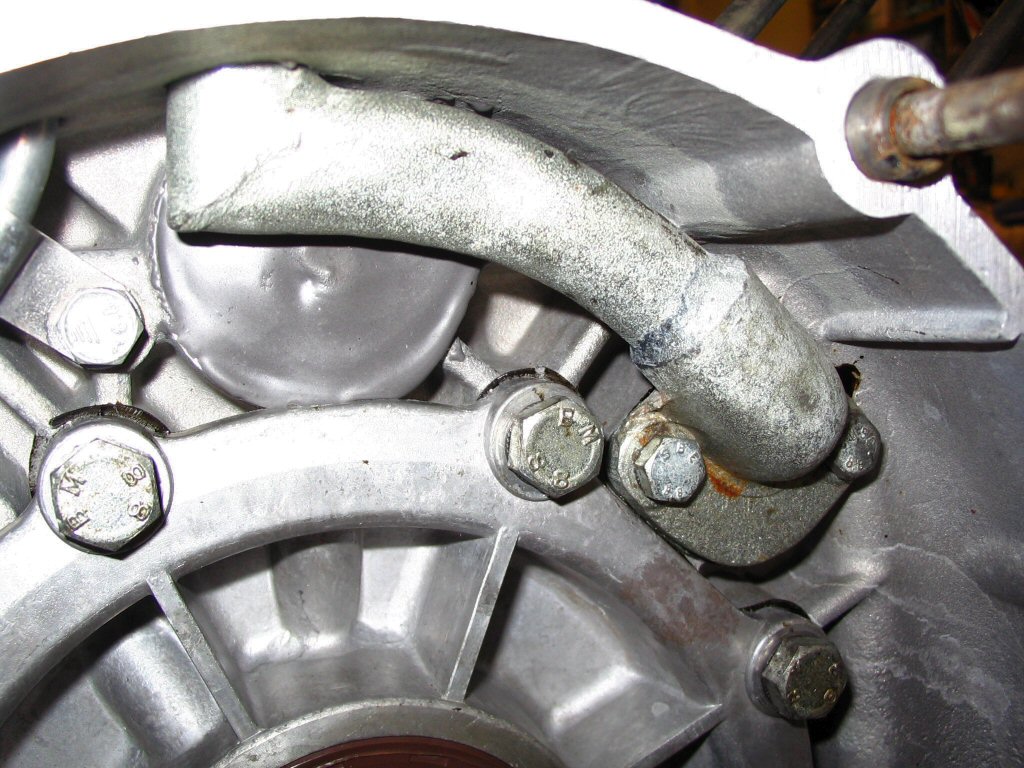
- J-B WELD the cam plug. The cam plug is notorious for leaking oil. If I can see one, I fix it. I rough it up with a bit of sandpaper, clean it up well with carb cleaner, and then apply a nice thick coating of J-B WELD. Make sure to get a good coating of J-B WELD especially at the joint between the plug and the engine case. The inlet pipe to the breather box is positioned very close to the cam plug. Often times I'll need to give the inlet pipe a little squeeze with a pair of pliers to get it to clear the additional thickness of the J-B WELD. I've been asked if the cam plug should be replaced or removed and J-B WELD applied to the surface that interfaces with the case. I've never tried it that way. But, I've heard that it can be very difficult to get a new cam plug in. I'm doubtful an existing cam plug could be reused once removed. The
patch on top
method seems to hold up very well.
Location of cam plug within the bell housing. Photo courtesy of Gregory Bender.

Location of cam plug within the bell housing. Photo courtesy of Gregory Bender.

Cam plug that has been sealed with J-B WELD. Photo courtesy of Gregory Bender.
Thanks to Charley Cole of Zydeco Racing who posted this information on the old Yahoo! Loopframe_Guzzi news group (which has now moved to Groups.io). In Charley's own words:
There is another major source of oil which can get into the bell housing and wreck your clutch that no one ever seems to mention. It's the two holes in the top of the crankcase for the breather tube and oil return line. Any oil that gets on top of the motor from a variety of sources can leak down those holes because no grommet or seal is used there and the metal tubes are much smaller than the holes they go through. Also, the short connecting rubber hoses fit over the fittings on the engine breather and the tubing going into the bell housing, so any deterioration of the hoses or loosening of the hose clamps allows a leak there. The tubes are then a direct path for the oil to run into the bell housing.
Whenever I have the motor and gearbox separated I always completely degrease the housing and tubes, and then seal that area on the inside where the holes in the crankcase are. You should take the opportunity to bend the tubing so that it is not in contact with the crankcase. The breather is mild steel and the oil return line is cad or zinc plated copper, so both are quite soft and can wear through from vibration. Also, while you are in there, check the routing of the smaller diameter oil drain line and make sure it is not in contact with the crankcase as it makes it's 180 degree semicircular journey from the top to the bottom of the bell housing. I put 3 or 4 dabs of silicone on the back of the crankcase that join the crankcase and the tubing. This damps any vibration and prevents the tubing from ever coming to rest on the crankcase. I've seen a number of these that were nearly worn through from vibration. If that ever happened you would destroy your clutch within miles and be pouring oil on your rear tire.
Be sure to check or replace the crush washers on the oil return banjo fitting. Another caution, that probably doesn't affect many Loop frame motors, regards the fitting of crankcase or oil pan spacers. Most are not very tall (around a half inch thick) but the ones I have used are around and inch thick. If you use one of these make sure that your oil return banjo fitting still protrudes below the level of the oil in your pan. If not you will have equalized the air pressure in your breather coming from the breather and oil return line and your check ball will not lift off it's seat and allow the engine to breath. You can also prevent oil from draining effectively from the breather causing it to wet sump and cease to function. If the breather completely loads up, you will start pushing oil out your vent hose like you popped a ring.